Science at Home
November 2020 | article & photos by stephanie hobby
As record numbers of families turn to home school and distance learning this year, many parents and caregivers are working their way up the steep learning curve of teaching around the kitchen table. Science is a subject many parents cite as most intimidating, but it doesn't have to be that way, particularly for families in Billings.
Home Science Tools, one of the nation's leading providers of homeschool science curriculum, kits, and scientific tools, is based in the Magic City. Founded more than 25 years ago by local homeschooling parents Frank and Debbie Schaner, the company has long had the goal of making the wonders of science accessible and affordable with a focus on "inspired learning." With projects and curriculum across every subject and level in science, Home Science Tools has helped educate more than one million children and families worldwide.
One of their best sellers is the Complete Introduction to Chemistry Kit, which offers dozens of hands-on experiments for a broad age range. With the kit, students can create invisible ink, separate salt from sand mixed in a jar, conduct chromatography activities, and build bouncy balls and slime.
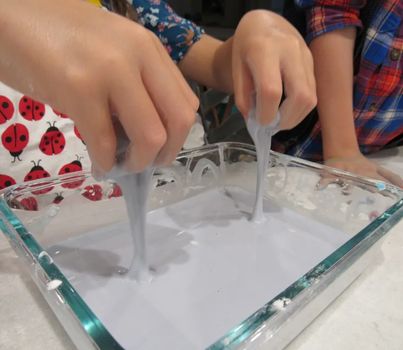
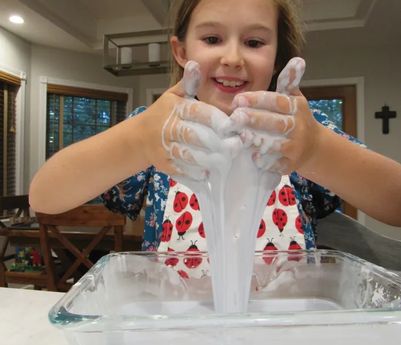
Making slime is a fantastic way to engage family members while introducing the concept of polymers to older students. “Something about them is super fun. Polymers are either bouncy or stretchy, or they’re slimy, and it’s because of the way those molecules interact with one another,” said Dr. Trevor Zuroff, chemical engineer and product director for Home Science Tools.
Polymers are essentially a long chain of molecules that are stuck together, and chances are really, really good that you’ve interacted with some type of polymer in the last five minutes - particularly if you’re reading this article on printed paper. Cellulose, a key component in the structure of plants and wood, is a polymer; most plastics and styrofoam are also polymers.
The behavior of polymers is very complex; in fact, Dr. Zuroff studied them during his PhD program. They're also tons of fun to play with, so introducing them to young children is a natural way to generate interest in a complicated subject.
In making slime, the object for younger elementary students is simply to have fun. "You just want to spark wonder in this age group," Dr. Zuroff said. Show your child that you can mix some things together, like water and a particular chemical, and it becomes something that behaves much differently than the individual ingredients. If they have a question and you don't know the answer, investigate it together, and keep it light. "What you don't want to do is quash that wonder with too much process or additional work," advised Dr. Zuroff.
Starting around fourth grade, ask students to observe more about what’s happening. Is the fluid behaving like water? If not, what is it doing that is different? When they have questions, you can ask how they think the answer could be found, and then work out the answers together.
As students get older, you can discuss slime's molecular structure and the physics behind how the material is behaving. Slime is a non-Newtonian fluid, meaning that it doesn't behave like water or other liquids that follow Newtonian laws. When you squeeze it, it can feel more solid (this is particularly true for oobleck, made from cornstarch and water); when you release it, it runs out between your fingers. When questions arise, answering, "I don't know, but what do you think?" assures students that they have the necessary background to come to a conclusion.
Aaaaand action!
You can find many different slime recipes online, but Home Science Tools offers a few that have been carefully developed over the years. Recipes and necessary ingredients are available at https://www.homesciencetools.com/article/how-to-make-slime/. By adding one additional ingredient to a slime recipe, you can make a bouncy ball at home!
How to Make a Colorful Bouncy Ball (Courtesy of Home Science Tools)
- 1 Tablespoon white glue (school glue / Elmer's glue)
- 1/2 Teaspoon borax
- 1 Tablespoon cornstarch
- 2 Tablespoons warm water
- 2 plastic cups
- 2 wooden craft sticks
- Food coloring
- First, make the glue mixture by pouring the glue into one of the plastic cups.
- Add a few drops of food coloring to the glue and mix with one of the craft sticks until you've achieved the desired color.
- To make the borax mixture, take the second cup and mix 2 Tablespoons of warm water with borax together. Stir with the second craft stick until dissolved.
- Add the 1 Tablespoon of cornstarch and 1/2 Teaspoon of the borax solution to the glue and let stand for 15 seconds.
- Stir with a craft stick until thoroughly mixed together, and the mixture becomes very difficult to stir.
- Mold the ball in your hands. It will be sticky at first but will become more solid as you roll it in your hands. At first, it will squish! It's kind of like playing with play dough putty until it hardens.
- You now have a bouncy ball! Try bouncing it and discover just how high it can go.
- Store your ball in an airtight container or Ziploc plastic bag, so it doesn't dry out and crumble.

What happened?
Glue contains polyvinyl acetate, a strong polymer that gives the ball strength. Cornstarch contains amylopectin, a polymer whose shape is “branched” like a tree and gives the ball elasticity, allowing it to bounce back to its original shape. Finally, borax connects the two polymers.
Once you’ve done steps 1-8, Dr. Zuroff encourages further experimentation. How high can you make the ball bounce? Is there something you could add more of to make it bounce higher? Create a data table and plot a graph and learn how to interpret data. Most importantly, have fun!
Originally printed in the November 2020 issue of Simply Local Magazine
Never miss an issue, check out SLM's digital editions here!